If you are a Windows 7 user, you're probably not familiar with the operation to create a new user account in Windows 7. As in Windows 7, the user account interface has been updated which allows each individual user to have their own location on the computer where they can store their personal data. Moreover, it also allows the owner of the computer to assign some certain accounts to perform administrative tasks like installing software, while other users can't.
In this case, here I would like to show you how to create a new account in Windows 7 and the tips you should keep in mind during the operation.
Tips: If unfortunately you lost Windows 7 password, you should take a look at how to bypass Windows 7 password with Windows password recovery program.
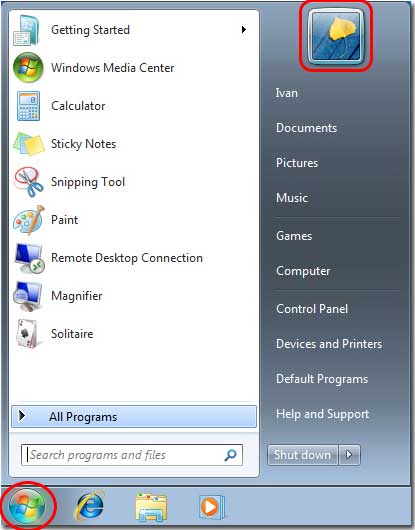
Step 1. Click the Windows 7 Start button, and then click the user icon in the top right corner of start menu.
Step 2. You will be brought to the User Accounts panel, just click the Manage another account button to access the User Accounts Control Settings. The dialog box shown as the red frame below.

Step 3. In this screen, it shows all the accounts currently on your computer. To create a new account, click on the Create a new account button which shown as the red frame below.

Step 4. Right now, you are at the Create New Account on Windows 7 screen. Enter the name of the new account that you would like to use in the new account name box.
As there are two types of Windows 7 user accounts and each provides the user with different levels of control over the computer. Thus, you need to decide which type of accounts you would like to use.
1. Administrator account which has full access to the computer and can make all changes say, install software, create and delete accounts.
2. Standard user account which has limited privileges on the settings and changes it can make to the computer.
It is recommended that for all users, you can create standard user accounts and have an administrator account that you can logon to according to your demands. Using your computer from an administrator account protects your computer from malware and other harmful activities.
When you have finished the selecting of a user name and the type of account you wish to setup, you should click on the Create Account button.
Step 5. Your new account has been created and it will appear on the Manage Accounts screen. Now the next step you should do is to create a password for the account.

Step 6. Click the Create a password button, set a strong password and password hint.

Now all steps have been completed. When you start Windows 7, you will see the new Windows 7 account listed in the logon screen, you can try it and start your computer trip with private data.
Copyright © 2014 Anmosoft Studio Windows Password Reset
![]()
 May 12, 2013/ Posted by
